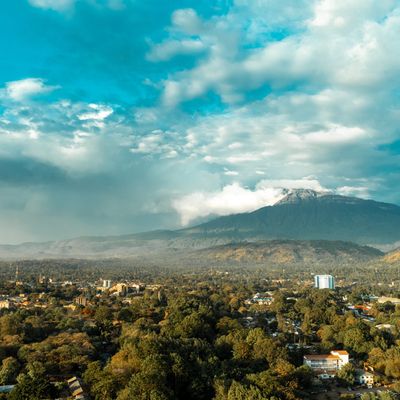


Tucked inside the wildlife-rich expanse of Arusha National Park, the Mount Meru climb is one of Tanzania’s most underrated adventures. Standing tall at 4,562 meters (14,968 feet), it’s the country’s second-highest peak—just 70 km west of Kilimanjaro—but offers a completely different hiking experience.
Quiet trails, dense rainforest, volcanic ridgelines, and a summit that greets you with sweeping sunrise views of Kilimanjaro—Mount Meru is dramatic, biodiverse, and far less crowded than its famous neighbour.
Overview of Mount Meru
Planning a Mount Meru climb? You’re in for one of the most underrated trekking adventures in Africa.
Climbing Mount Meru Tanzania style means steep switchbacks, sun-drenched crater ridges, and waking up above the clouds with Kilimanjaro glowing in the distance.
Unlike the busy Kilimanjaro routes, Mount Meru offers a quieter, wilder trail. You’ll walk through misty rainforest, pass giraffes and curious monkeys, and summit just in time to watch the sunrise over Africa’s tallest mountain.
Where is Mount Meru?
Mount Meru rises from within Arusha National Park, in northeastern Tanzania.
- It’s just a 45-minute to 1-hour drive from the city of Arusha
- Around 70 km west of Mount Kilimanjaro
- And about 1 to 1.5 hours from Kilimanjaro International Airport (JRO)
Its close proximity to JRO and Arusha makes it a perfect first stop for anyone planning a Kilimanjaro climb or northern Tanzania safari.
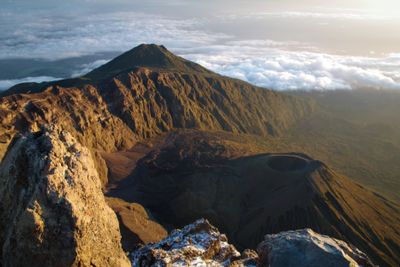
The mountain itself is a strikingly symmetrical volcano with a dramatic history. Over 7,000 years ago, a massive eruption blew out its eastern side, carving the vast horseshoe-shaped crater you’ll now hike along. It’s not just a trek—it’s a walk through time.
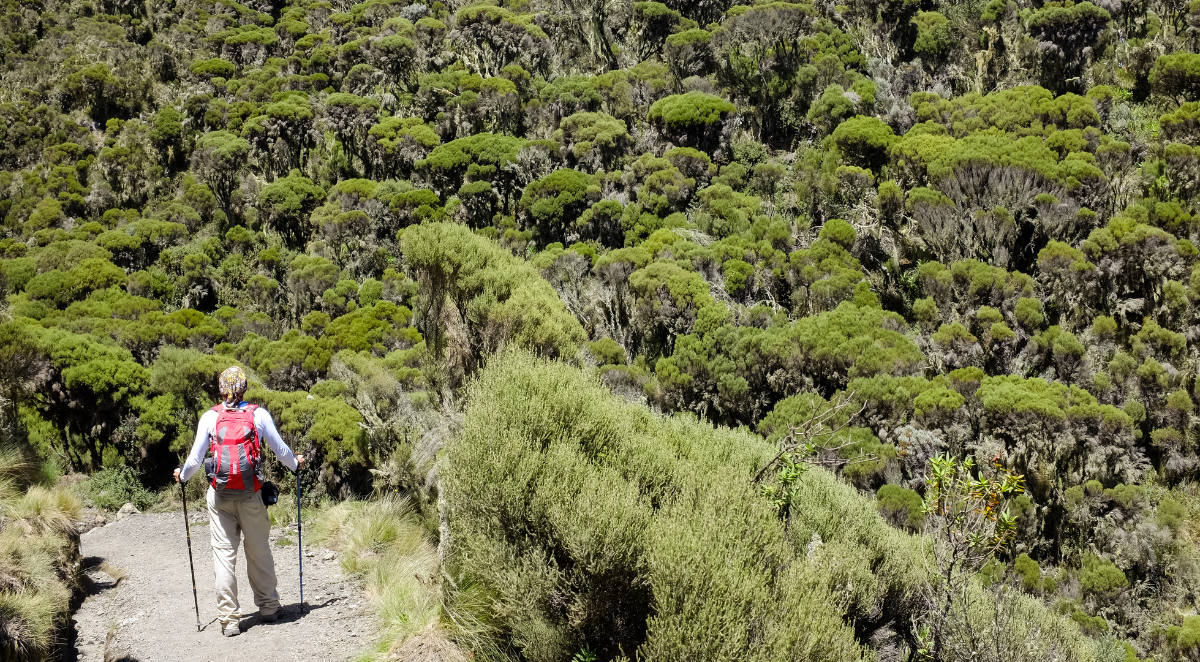
A wild and varied hike through multiple ecosystems
What makes Mount Meru special isn’t just the height—it’s the incredible mix of terrain along the way.
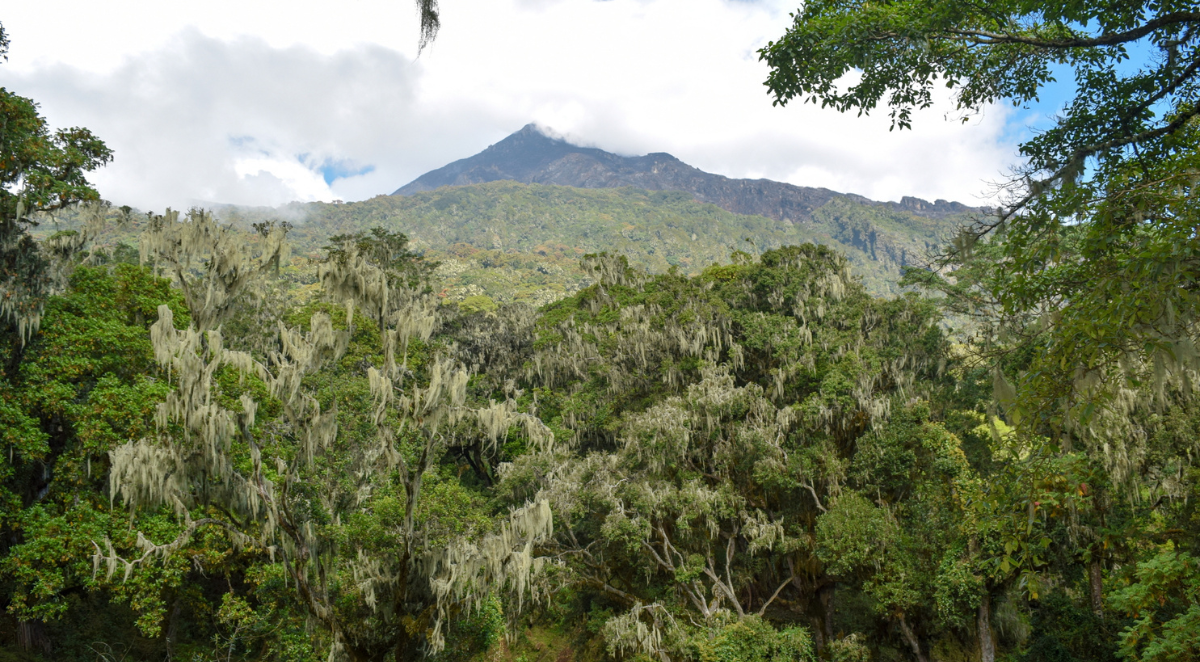
The trek begins in lush montane forest, where tangled fig trees shelter colobus monkeys and giraffes sometimes wander across the trail. As you gain altitude, the scenery shifts from rainforest to moorland, then to sparse high-altitude terrain near the crater rim.
No other trek in Tanzania packs so many ecosystems into such a compact route.
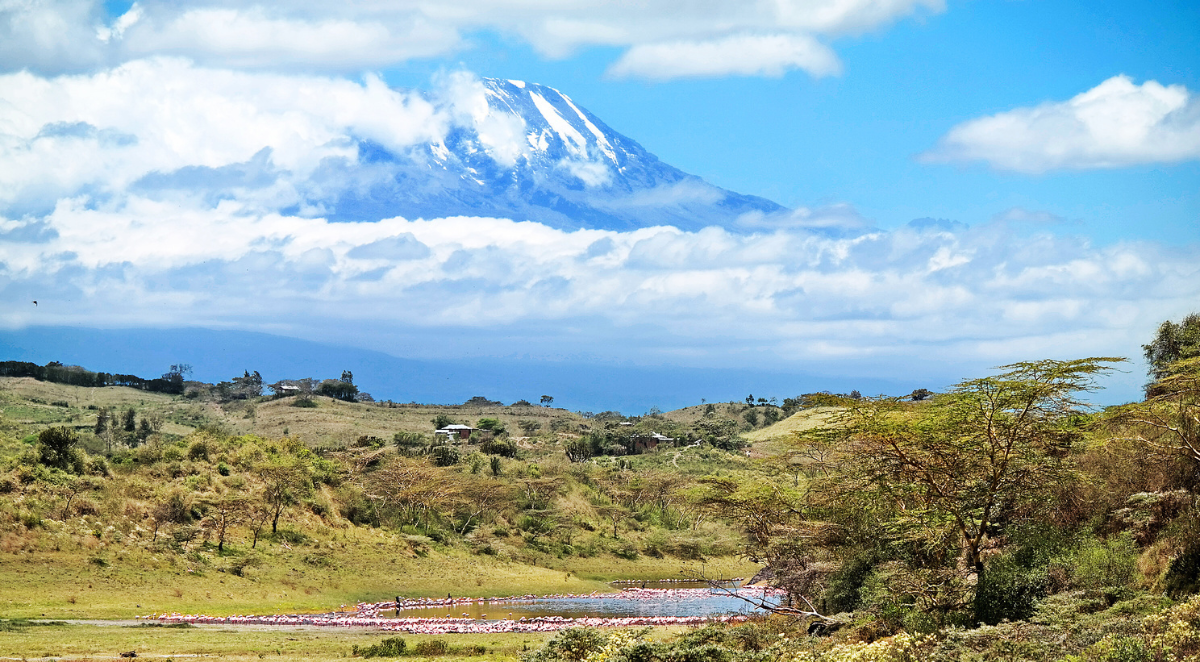
One of the most surreal moments? Reaching the crater rim at sunrise, with the sky glowing orange and Kilimanjaro rising in the distance like a floating mirage. The summit route follows a dramatic ridgeline above a massive horseshoe-shaped crater—about 3.5 km wide—formed by a colossal eruption roughly 7,800 years ago that blew out the eastern flank of the volcano.
And since you're hiking inside a national park, you'll be accompanied by an armed ranger—both for safety and for the chance to spot wildlife as you go.
The geology and geography behind the mountain
Mount Meru is a potentially active stratovolcano and part of the East African Rift, the tectonic zone responsible for much of the region’s dramatic landscape. Its coordinates (for the map lovers among us) are roughly 3°14′38″S and 36°44′53″E. The massive crater left by an ancient eruption is a standout geological feature, visible even from the plains surrounding Arusha.
But this isn’t just an epic trekking route. The mountain plays a critical role in regional ecology, feeding rivers, nurturing plant life, and providing habitat to countless species of animals and birds. It’s also deeply rooted in local culture—the Meru people, who live nearby, consider it sacred.
Why climb Mount Meru?
If you’re heading for Kilimanjaro, a Mount Meru hike is the perfect warm-up.
- You’ll sleep above 3,500 meters, prepping your body for altitude
- You gain elevation gradually, which helps with acclimatisation
- You’ll get to test your gear and stamina before taking on Kili
- You reduce the risk of altitude sickness on your next big summit
But even if Kilimanjaro isn’t on your list, climbing Mount Meru Tanzania is absolutely worth it.
- The trek is scenic, quiet, and full of wildlife
- It’s challenging but not extreme
- It costs less than half of a Kilimanjaro climb
- You get summit views of Kilimanjaro—a pretty unbeatable payoff
Climbing Mount Meru Tanzania: What to expect
How hard is it to climb Mount Meru? It’s steep—but absolutely doable. Most climbers complete the route in 4 days, covering roughly 45 kilometres (28 miles) round trip. The hike takes you through a series of dramatic and ever-changing ecosystems.
- Day 1: Begin in the rainforest. You’ll hike through dense vegetation, cross streams, and spot wildlife like colobus monkeys and giraffes.
- Day 2: The trail opens up into heath and moorland. The air thins, the trees shrink, and the views grow wider.
- Day 3: Your summit push starts before dawn. You’ll hike under a starlit sky, past ash cones and along narrow ridgelines.
- Day 4: After reaching the top, you descend back through the forest—legs tired, memory card full.
The summit—Socialist Peak—sits right on the crater rim and offers panoramic views over the ash cone inside the crater, the cliffs of the collapsed eastern wall, and Kilimanjaro gleaming on the horizon.
It’s a technical hike at times, especially near the top, but no ropes or climbing experience are required. Just solid fitness, good hiking boots, and the right attitude.
Mount Meru hike terrain and difficulty
Climbing Mount Meru isn’t just a hike—it’s a full-on alpine safari.
The trail is narrow, steep, and rugged in sections, winding through dense rainforest, open moorland, and along sharp crater ridgelines.
What to expect on the trail:
- Steep switchbacks through the forest and up the crater
- Rocky ridgelines that demand steady footing
- Cold and windy summit weather, especially before dawn
- Altitude symptoms may kick in around 3,500 meters (11,500 feet)
What kind of shape do you need to be in?
- Fitness level: Moderate to high
- Technical skills needed: None
- Best for: Adventurous hikers with some trekking experience
Mount Meru is often described as “more scenic, less crowded, and just as satisfying” as Kilimanjaro. The summit push is steep and starts in the dark—but the views of the crater and Kilimanjaro are 100% worth the early wake-up call.
Best time to climb Mount Meru
You can hike Mount Meru year-round—but if you want clear views and dry trails, it pays to time it right.
Best seasons to climb Mount Meru:
The best seasons to climb Mount Meru are:
- January to early March – Sunny mornings, dry trails, and stunning summit views
- June to October – Cooler, drier months with ideal conditions for high-altitude trekking
When to avoid climbing Mount Meru:
- April to May – Long rainy season. Expect muddy trails, thick clouds, and wet gear
- November – Short rains. It’s not a total washout, but the trails can be slick and foggy
Dry-season climbs mean better odds of seeing Mount Kilimanjaro at sunrise, fewer delays, and a more enjoyable experience overall.
Wildlife on Mount Meru
This isn’t just a hike—it’s practically a walking safari.
Mount Meru is one of the only places in the world where you’ll start a summit hike surrounded by animals. The lower slopes sit inside Arusha National Park, meaning there’s a good chance you’ll spot big game before you even break a sweat.
Wildlife you might see on the trail:
- Colobus and blue monkeys swinging through the forest canopy
- Giraffes grazing along the open slopes
- Buffalo resting near the trail (don’t worry—your ranger’s got this)
- Zebras and other plains animals around the Momella Gate
- Tons of birdlife, including hornbills, turacos, and birds of prey
Your mandatory park ranger escort isn’t just for safety—it also makes the experience that much more unique. Where else does your summit attempt begin with a chance of zebra traffic?
Preparing for the Mount Meru hike
Getting ready for Mount Meru doesn’t mean boot camp—but it’s not a walk in the park, either. The trek is steep, the air gets thin, and summit day can be a grind. The better shape you’re in, the more you’ll enjoy it.
Training and fitness requirements
You don’t need to be an elite athlete to climb Meru, but some solid fitness goes a long way. The hike isn’t technical, but it’s physically demanding—especially as you gain altitude.
Here’s what helps:
- Endurance – Long hikes, runs, or bike rides build the stamina you’ll need.
- Strong legs – Squats, lunges, and step-ups prep you for those uphill pushes.
- Core balance – Trails get uneven. A stable core keeps you steady.
- Mental grit – The summit push is cold, dark, and long. Being mentally prepared matters just as much as physical training.
If you’re starting from scratch, aim for three to four workouts a week for a couple of months before your climb. And definitely get outside with a loaded daypack if you can. Simulating the trail is the best prep.
Summit day? Expect 10–12 hours on your feet. It’s a lot—but if you’ve trained, it’s manageable and incredibly rewarding.
Essential gear and packing list
Mount Meru climbs through four climate zones in just a few days. You’ll start in a warm rainforest and finish on a cold, windswept summit. Layers are your best friend.
Clothing must-haves:
- Waterproof hiking boots (already broken in)
- Quick-dry base layers (no cotton)
- Fleece or insulated midlayer
- Waterproof outer jacket and pants
- Warm hat and gloves
- Thick socks (plus a dry spare pair)
Gear essentials:
- Daypack (20–30 liters with hip support)
- Trekking poles (huge help on the descent)
- Headlamp (you’ll start summit day before sunrise)
- 3 liters of water (bottles or bladder)
- Sunscreen, sunglasses, lip balm
- Basic first aid and any altitude meds
- Snacks (trail mix, energy bars, dried fruit—whatever keeps you moving)
Porters carry your main duffel, but you’ll be hiking with your daypack. Pack light but smart—keep warm layers and snacks handy.
What to expect on the Mount Meru climb: Itinerary
Here’s how the classic 4-day Mount Meru climb usually plays out. The route takes you through thick rainforest, eerie moorland, and alpine desert before you hit the summit at Socialist Peak. It’s wild how much the landscape shifts—and yes, there’s wildlife too. Giraffes, monkeys, zebras. Not what you'd expect on a mountain trail.
Day 1: Momella Gate to Miriakamba Hut – Into the rainforest
- Distance: ~10 km (6.2 miles)
- Hiking time: 4–6 hours
- Start altitude: 1,500 m (4,921 ft)
- End altitude: 2,514 m (8,248 ft)
The trek kicks off at Momella Gate in Arusha National Park. You’ll check in, meet your climbing Mount Meru Tanzania crew, and likely spot a few animals even before setting foot on the trail—zebras, giraffes, and warthogs are known to hang around.
Once you start walking, it’s all dense rainforest and winding paths. Expect giant fig trees, colobus monkeys bouncing between branches, and maybe even a waterfall or two depending on the season.
By late afternoon, you reach Miriakamba Hut, perched at 2,514 meters. It’s a basic bunkhouse, but it feels like a palace after the day’s uphill walk. Hot dinner, tea, and stars if the clouds clear.
Day 2: Miriakamba to Saddle Hut – Into the moorland
- Distance: ~8 km (5 miles)
- Hiking time: 3–5 hours
- Start altitude: 2,514 m (8,248 ft)
- End altitude: 3,570 m (11,713 ft)
Today, you’ll leave the rainforest behind and head into heath and moorland. The landscape starts to feel a little more rugged, and you'll get incredible views of the crater rim and Mount Kilimanjaro in the distance.
Along the way, you’ll pass through Elephant Back Ridge, a zigzagging path that gives you panoramic views and the chance to spot colobus monkeys swinging through the trees.
After a day of hiking, you’ll arrive at Saddle Hut at 3,570 meters (11,713 feet). You’ll eat an early dinner, then have a quick briefing for the summit push. There’s also a short acclimatisation hike to Little Meru (3,820 m / 12,532 ft) in the afternoon if you feel up to it.
Day 3: Summit Day – Saddle Hut to Socialist Peak – The big push
- Distance: ~19 km (11.8 miles)
- Hiking time: 10–12 hours
- Start altitude: 3,570 m (11,713 ft)
- Summit altitude: 4,562 m (14,968 ft)
- Descent altitude: 2,514 m (8,248 ft)
Get ready for an early start—around 2 am—so you can make it to Socialist Peak (4,562 m / 14,968 ft) before sunrise. This is the toughest part of the hike. It’s steep, rocky, and windy, with high-altitude scree to scramble over. Temperatures will be freezing, but you’re doing it for the view.
Once you reach the summit, the view will be worth every step. You’ll catch the first light of dawn illuminating Mount Kilimanjaro, with the glowing Meru crater at your feet and all of Arusha below.
After a few victory photos, you begin the descent back down to Miriakamba Hut at 2,514 meters (8,248 feet). This will be a long and tiring trek, but the thrill of the summit keeps you going.
Day 4: Miriakamba Hut to Momella Gate – A gentle descent
- Distance: ~10 km (6.2 miles)
- Hiking time: 2–3 hours
- Altitude: 2,514 m (8,248 ft) to 1,500 m (4,921 ft)
The last day is a relatively easy descent. It’s a short 10 km hike, but you’ll be able to take it slow and soak in the beauty of the forest one last time.
Along the way, you might encounter more wildlife, including zebras and various bird species. As you near the gate, you’ll pass the famous Fig Tree Arch and the Tululusia River waterfall—perfect for a refreshing dip if you’re feeling hot.
Finally, you’ll reach Momella Gate and sign out. After tipping your crew (a customary gesture), you’ll likely celebrate with a well-earned soda before heading back to your hotel.
For more info on your Mount Meru itinerary, click here.
Accommodation and food on Mount Meru
No tents needed on your Mount Meru climb—just solid mountain huts.
What the huts offer:
- Dorm-style rooms with bunk beds and thin mattresses
- Shared toilets (mostly squat-style)
- Communal dining areas for group meals
Simple, but a huge upgrade from sleeping on the ground.
Meals on the mountain:
- Breakfast: Porridge, eggs, toast, tea or coffee
- Lunch & dinner: Rice, stews, soup, and vegetables
- Extras: Ginger tea, popcorn, sometimes fruit
Everything is carried and cooked by your team. Porters handle gear. Your cook prepares hot meals. You just hike.
Tip: Bring your own snacks for summit day—you’ll thank yourself halfway up.
Climbing Mount Meru in Tanzania isn’t just scenic. It’s also one of the more comfortable treks in East Africa.
Tips for a successful Mount Meru climb
If you’re planning a Mount Meru climb, a little preparation goes a long way. Here’s how to make sure your trek is safe, comfortable, and as rewarding as it should be.
1. Give your body time to adjust
Altitude sickness doesn’t care how fit you are. The best way to avoid it? Don’t rush. A 4-day itinerary gives your body time to acclimatise gradually—boosting your chances of reaching the summit feeling strong. That extra day can make all the difference on a Mount Meru hike.
2. Pack smart, not heavy
Conditions change fast on the mountain, so your gear needs to cover all bases. Please refer back to the “Essential gear and packing list” section.
3. Train like you mean it
You don’t need to be an ultramarathoner—but regular cardio, hill training, and hikes with a loaded backpack will help your body handle the real thing. Strength training builds the endurance you'll need for steep sections, especially on summit day.
4. Climb with the right crew
Experienced, licensed guides are non-negotiable. Not just for safety—they’ll also point out wildlife, explain the terrain, and manage logistics. When you’re climbing Mount Meru in Tanzania, local guides bring the mountain to life in a way GPS apps never could.
5. Respect the trail
Mount Meru sits inside Arusha National Park, a protected conservation area. Stick to marked trails, don’t litter, and follow Leave No Trace principles. If we all do our part, future trekkers can enjoy the same unspoiled landscapes.
Mount Meru vs Kilimanjaro: Which trek is right for you?
So, you’re trying to choose between climbing Mount Meru and Mount Kilimanjaro? You’re not alone. These two Tanzanian giants offer totally different experiences—and depending on your budget, fitness level, and what you want out of your adventure, one might be a better fit than the other.
Here’s a quick side-by-side to help you out:
Why choose Mount Meru?
If you love wildlife, value quiet trails, and want a budget-friendly trek with epic scenery, Meru is a total gem. It's also a brilliant option if you’re preparing to summit Kilimanjaro later—hello, acclimatisation boost!
Climbing Meru gives you:
- A less commercial, more intimate trekking experience
- Close-up encounters with giraffes, colobus monkeys, and zebras
- Dramatic crater views and a knife-edge summit ridge (yes, it’s as cool as it sounds)
Why go straight for Kilimanjaro?
If you’re here to conquer Africa’s tallest mountain and tick off a big bucket list item, then Kilimanjaro’s your goal. It’s tougher, higher, and takes longer—but the bragging rights are real.
How to book your Mount Meru climb: Permits, guides, and tips
Mount Meru isn’t your average day hike—you need to plan a few things in advance. But don’t worry, it’s all pretty straightforward (especially with us helping you out ).
First up: You must have a guide
Yup, all climbers are required to trek Mount Meru with a registered guide and an armed ranger. It’s not just for safety—it’s because Arusha National Park is home to big game like elephants and buffalos. The ranger joins your group to keep both you and the animals safe.
Permits and park fees
Here’s what you’ll need:
- Park entry fee: Around $45 per day
- Conservation fee
- Camping/hut fee: You’ll be staying in designated huts
- Rescue fee
- Guide and ranger fees
If you’re going with a reputable tour operator (like us ), all of these are usually included in your package.
Choosing a tour operator
Look for someone who:
- Uses certified, experienced guides
- Offers proper acclimatisation advice
- Provides clean, safe huts and gear
- Is transparent about what’s included (and what’s not)
- Has great reviews from past trekkers
Avoid the too-good-to-be-true deals. If it’s cheap, something’s probably missing (usually safety or decent food).
When to book
We recommend booking at least 1–2 months in advance, especially in peak seasons (June to October and January to March). That gives time to sort permits, gear, and pre-climb prep.
Can I rent gear in Arusha?
Totally. If you don’t want to lug boots and sleeping bags on your international flight, you can rent pretty much everything in Arusha—jackets, poles, backpacks, headlamps—you name it.
Just double-check what’s included in your trek and what you might need to rent separately.
Your Mount Meru adventure starts here
A Mount Meru hike doesn’t need to play second fiddle to Kilimanjaro. It’s its own kind of epic: fewer crowds, more wildlife, and views that genuinely stop you in your tracks. You’ll walk through misty rainforest, cross crater rims above the clouds, and catch Kilimanjaro glowing pink in the morning light.
The trail is steep in parts, sure. But if you're looking for a quieter, wilder trek with just the right mix of challenge and beauty, the Mount Meru climb is it.
Curious? Follow Alice’s Mount Meru hike is a great place to get started.